如何用v2ray+vps搭建梯子
Why 搭梯子
What’s v2ray
Refer here
之前是用的SSR(shadowsocks),但是发现经常服务器经常被禁。所以转战v2ray。
V2RAY 在安全、伪装、稳定等方面几乎是碾压 SSR。
既然这样为什么 V2RAY 不普及了?因为 SSR 比 V2RAY 先出道,市面上更多的客户端对于 SSR 的匹配炉火纯青。但是现在 V2RAY 在“强”的不断催促下,也迸发出了转机。
由于各大鸡鸡的提供商和“番茄”爱好者的纷纷转入 V2RAY,所以很多适配的软件也挺多了,但是手机上的app都是收费的。
What’s vultr(vps) ?
Vultr 是 美国的VPS服务商,从2014年开始提供云VPS服务。实力雄厚,全球有15个数据中心,包括亚洲、欧洲、美国等多个地区,亚洲地区有日本和新加坡两个数据节。
Vultr最便宜的VPS大概是1vCPU, 1GB Memory, 1TB bandwidth 是每个月5$。
VPS是Virtual Private Server的缩写,意思是虚拟专用服务器。说简单点就是一台别人帮你运行的电脑,跟平常自己用的电脑功能一样,但是它有一个IP(相当于地址,你可以在网络上找到这台电脑),当然它也可以访问网络。一般是通过KVM技术创建多台服务器。
注意VPS和我们在公有云用的VM不是很相同,VPS要比公有云的虚拟机更便宜,公有云一般是通过OpenStack技术创建多台服务器。
通过在vultr上创建vps,可以创建一个有公网IP的专有虚拟机。
How to 搭梯子?
Server Install
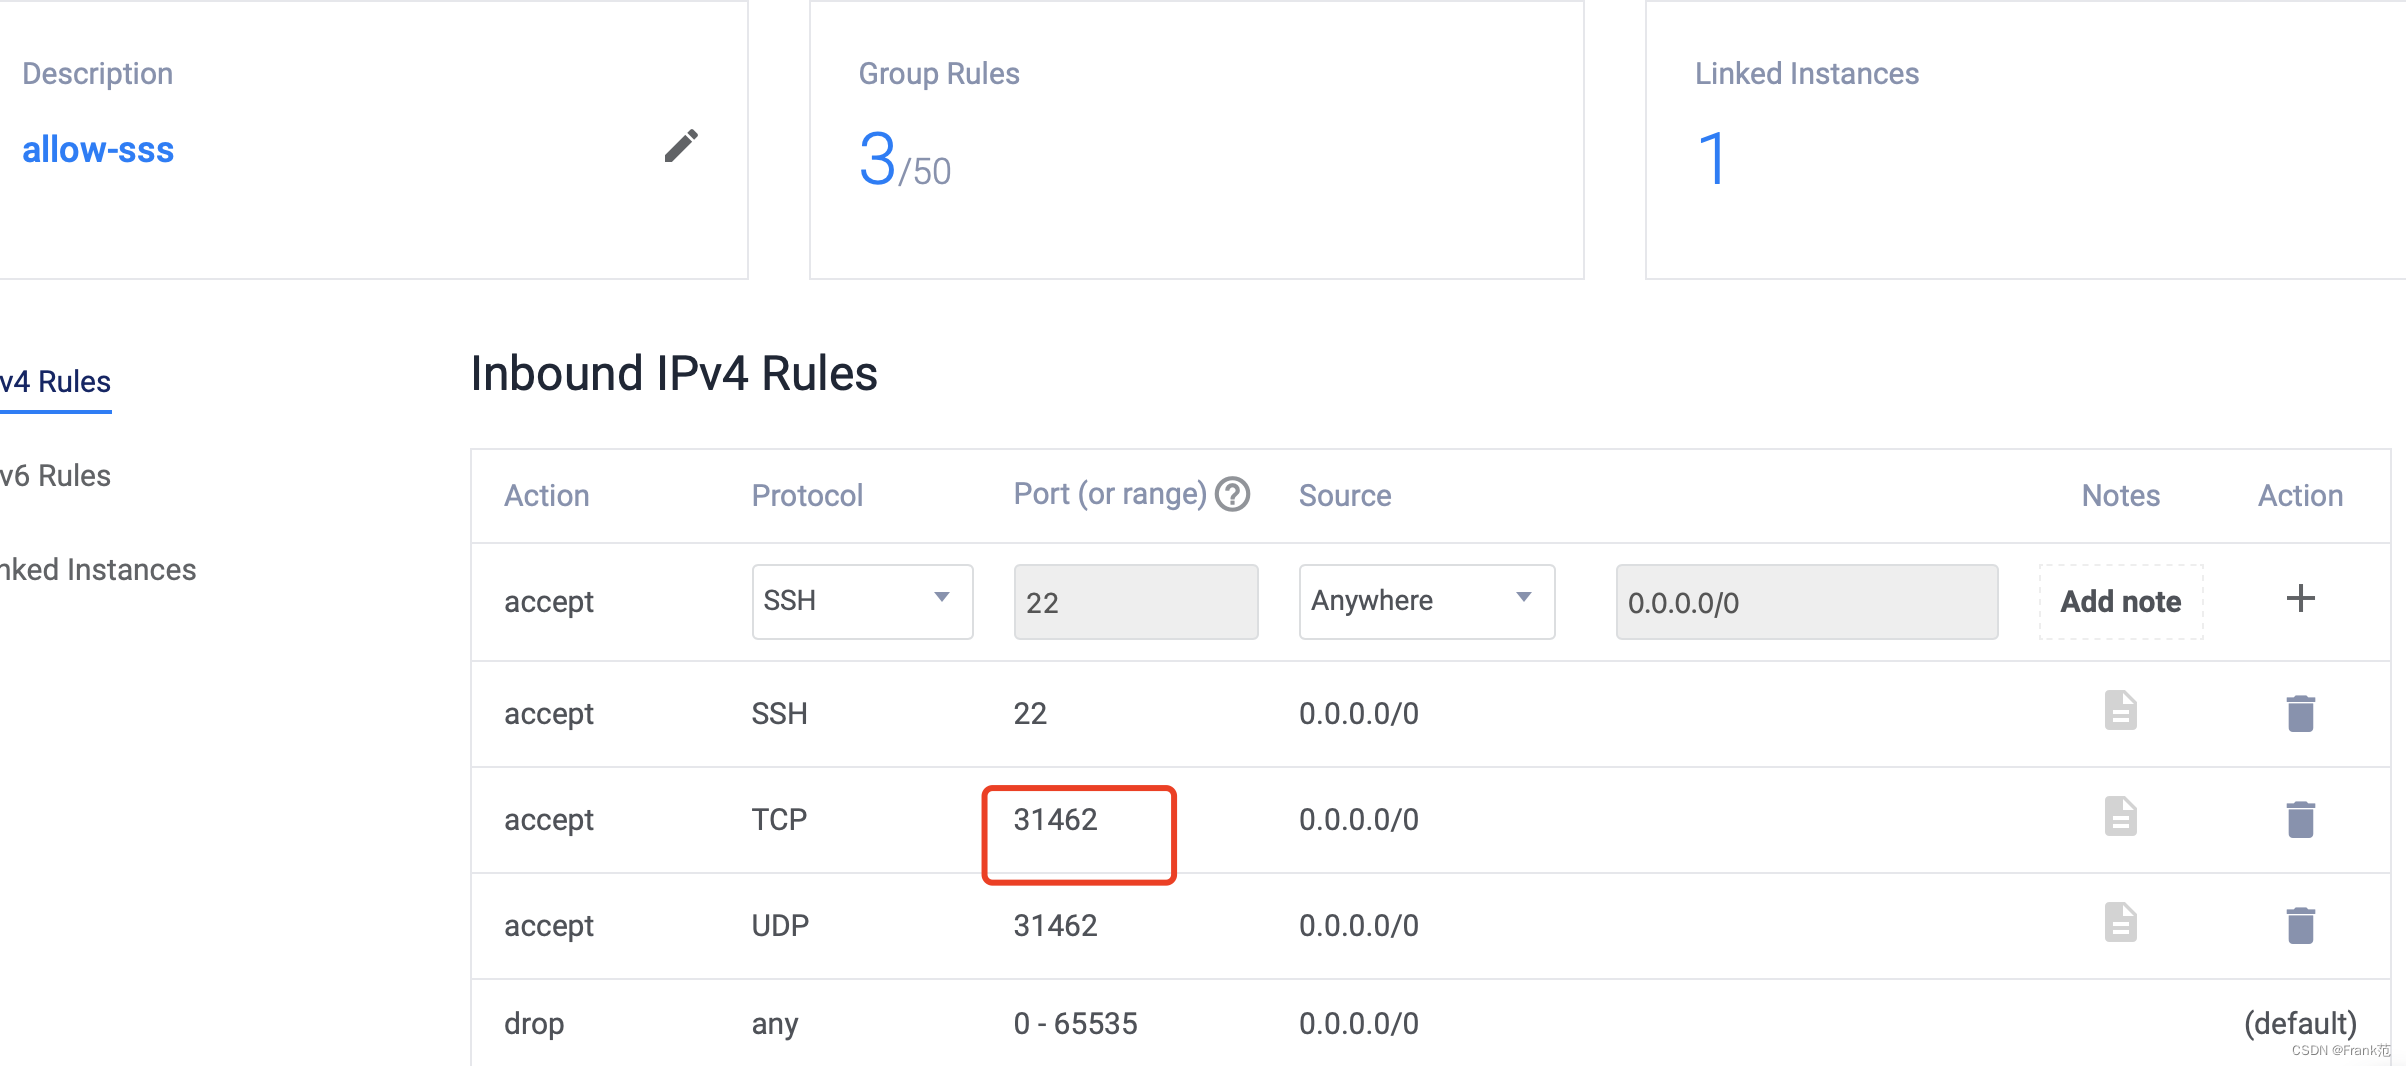
- Createa a filewall, access https://my.vultr.com/firewall/ . 31462 是vps中运行v2ray的端口。

- Create startup script, access https://my.vultr.com/startup/.
 install_ss 内容如下,就是安装v2ray并做基本的配置。请更换一个你自己的64位id,这个id其实就是一个密码,客户端和服务端都需要配置。另外也可以修改port,但注意同时也要允许在firewall中allow to access this port both udp and tcp.
1
2
3
4
5
6
7
8
9
10
11
12
13
14
15
16
17
18
19
20
21
22
23
24
25
26
27
28
29
30
31
32
33
34
35
36
37
38
39
40
41
42
43
44
45
46!/bin/sh
set -u
set -e
touch /var/log/test
systemctl stop firewalld.service && systemctl disable firewalld
curl -L https://raw.githubusercontent.com/v2fly/fhs-install-v2ray/master/install-release.sh | bash
/usr/local/etc/v2ray/config.json<<EOF
{
"log": {
"access": "/var/log/v2ray/access.log",
"error": "/var/log/v2ray/error.log",
"loglevel": "debug"
},
"inbound": {
"port":31462,
"protocol": "vmess",
"settings": {
"clients": [
{
"id": "a1f94c38-f84d-43cd-981d-f1732f447a42",
"level": 1,
"alterId": 0
}
]
},
"streamSettings": {
"network": "kcp"
},
"detour": {
"to": "vmess-detour-522598"
}
},
"outbounds": [
{
"protocol": "freedom",
"settings": {}
}
]
}
EOF
sed -i '11i\Environment="V2RAY_VMESS_AEAD_FORCED=false"' /etc/systemd/system/v2ray.service
systemctl daemon-reload
systemctl enable v2ray
systemctl restart v2ray
echo "done" - Deploy a new instance. 选择centos7, firewall group, startup script.
 大概过个20分钟, v2ray就可以自动setup好。
### Client Install
 - Mac 安装v2rayx
1
brew install --cask v2rayx
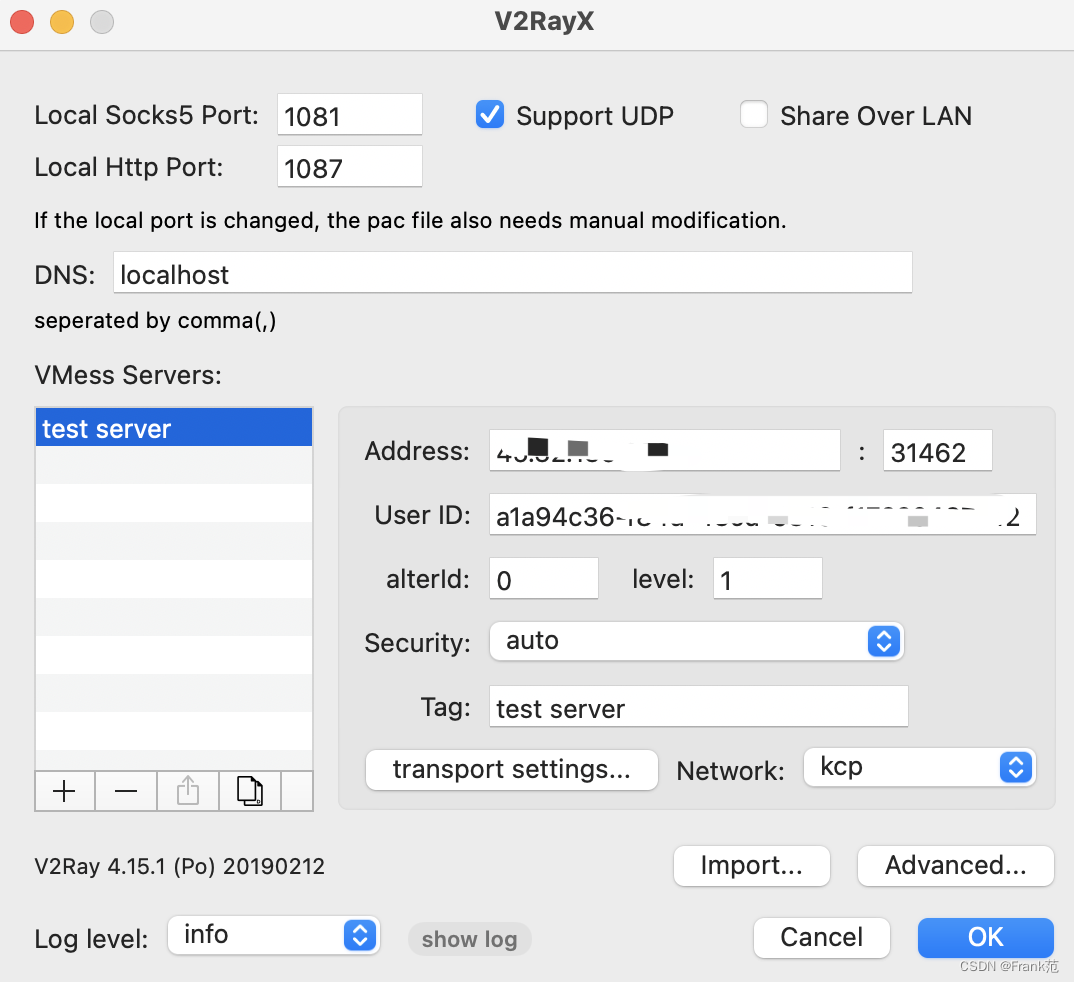
- 设置Address 是server的公网IP,port 是在/usr/local/etc/v2ray/config.json 中设置的port,User ID也是在/usr/local/etc/v2ray/config.json设置的id。

Troubleshooting
1 | # server logs |
Automation
如果想定时destroy 和start server,只是为了省钱,大概可以省2/3的钱,穷,没办法。
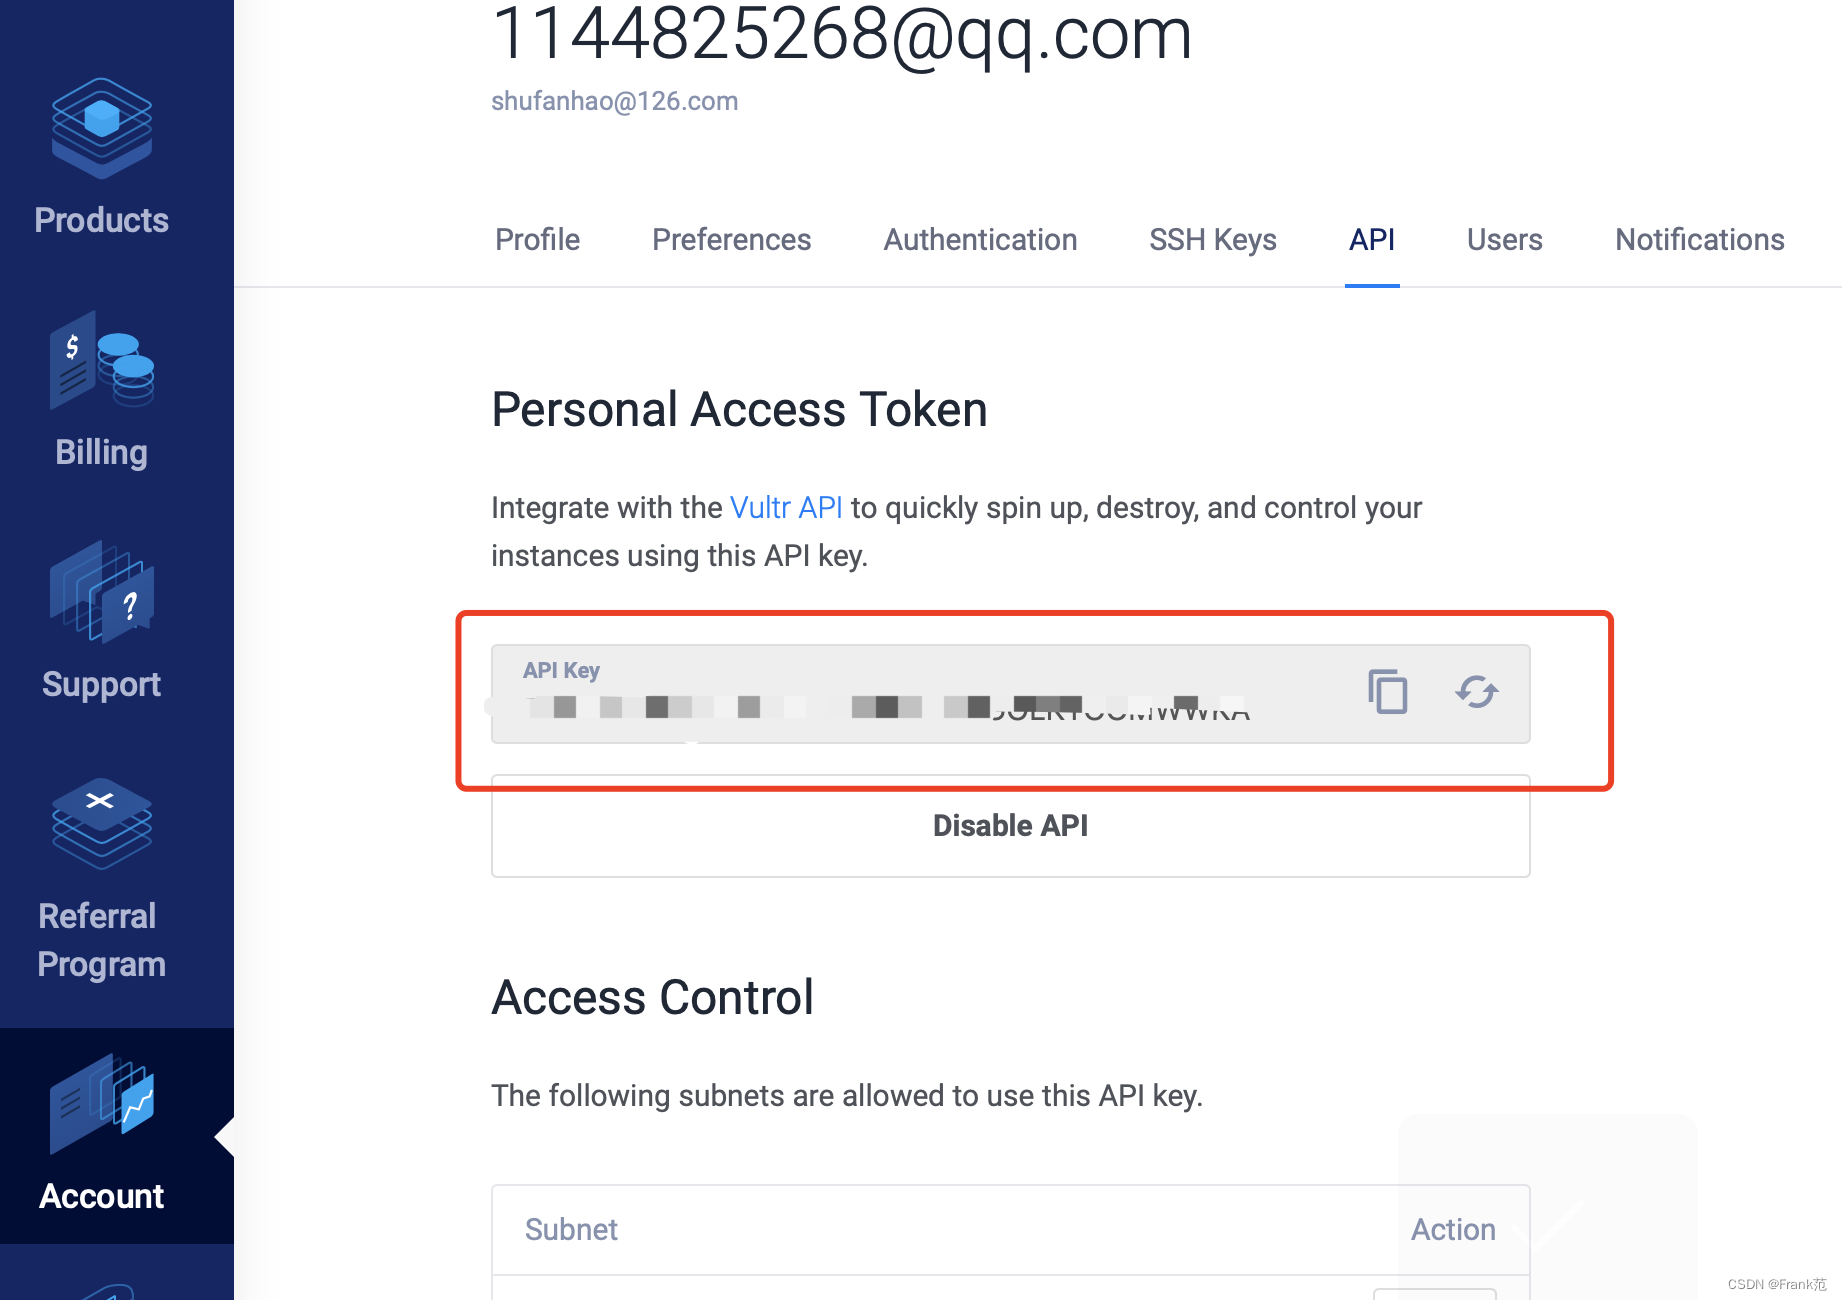
- Get api-key. Account -> Personal Access Token.

- Create vultr-cli.yaml, update api-key to above personal access token.
1
2
cat ~/.vultr-cli.yaml
api-key: xxxxxx - Install vultr cli. Refer: https://github.com/vultr/vultr-cli
1
2
brew tap vultr/vultr-cli
brew install brew install vultr-cli - Create alias command in your Mac. By
vultr-cli script listto know script id. refer here to get region id.1
2
3
4
5alias vultr_list_vm="vultr-cli instance list"
alias vultr_delete_vm="vultr-cli instance delete $(vultr-cli instance list | awk '{print $1}' | sed -n 2p)"
alias vultr_stop_vm="vultr-cli instance stop $(vultr-cli instance list | awk '{print $1}' | sed -n 2p)"
alias vultr_start_vm="vultr-cli instance start $(vultr-cli instance list | awk '{print $1}' | sed -n 2p)"
alias vultr_create_vm="vultr-cli instance create --region nrt --plan vc2-1c-1gb --script-id 83fdbdbc-2789-4b0f-ac5a-663bda866faa --firewall-group c0197040-ebc9-4df5-a3f2-04ba4af871e8 --os 167 --label shadowsocks"
欢迎关注我个人公众号: